

-
Products
Overview Products

-
2D Cutting
-
Tube Cutting
-
3D Cutting
-
Intelligent Welding
-
Intelligent Cutting Head
-
Industrial Automation
-
Industrial Software
-
Combination
-
Combination
BOCHU New Product -
Combination
Controller
BOCHU New Product -
BOCHU New Product
-
2D Cutting Head
Tube Cutting Head
3D Cutting Head
Consumables
BOCHU New Product -
Servo
BOCHU New Product -
Industrial 4.0
-
- Support
- About
- Online Store










- Software Download
- Tutorial
- CloudNest
I. Overview
TubesT supports batch modification of part information such as part names, marking, inkjet printing, quantities, and prices, making it convenient for centralized editing and management of parts. The table below shows the version support for each function.
| Function | Version |
| Batch Modify Part Names | Supported starting from 2026V3.2 |
| Batch Add Text |
Supported starting from V1.25: Batch adding text within the software. The added text will be placed at the tube end and automatically avoid inner holes. Supported starting from V1.39: Batch modification of added text content/parameters. |
| Batch Modify Part Quantities and Prices | Supported starting from V1.25 |
| Batch Modify Inkjet Print |
Supported starting from V1.25 |
II. How to Use
In the upper right corner of the "Part List Panel", click Batch Modify Parts to enter the Batch Edit window. After editing, click OK.

III. Function Description
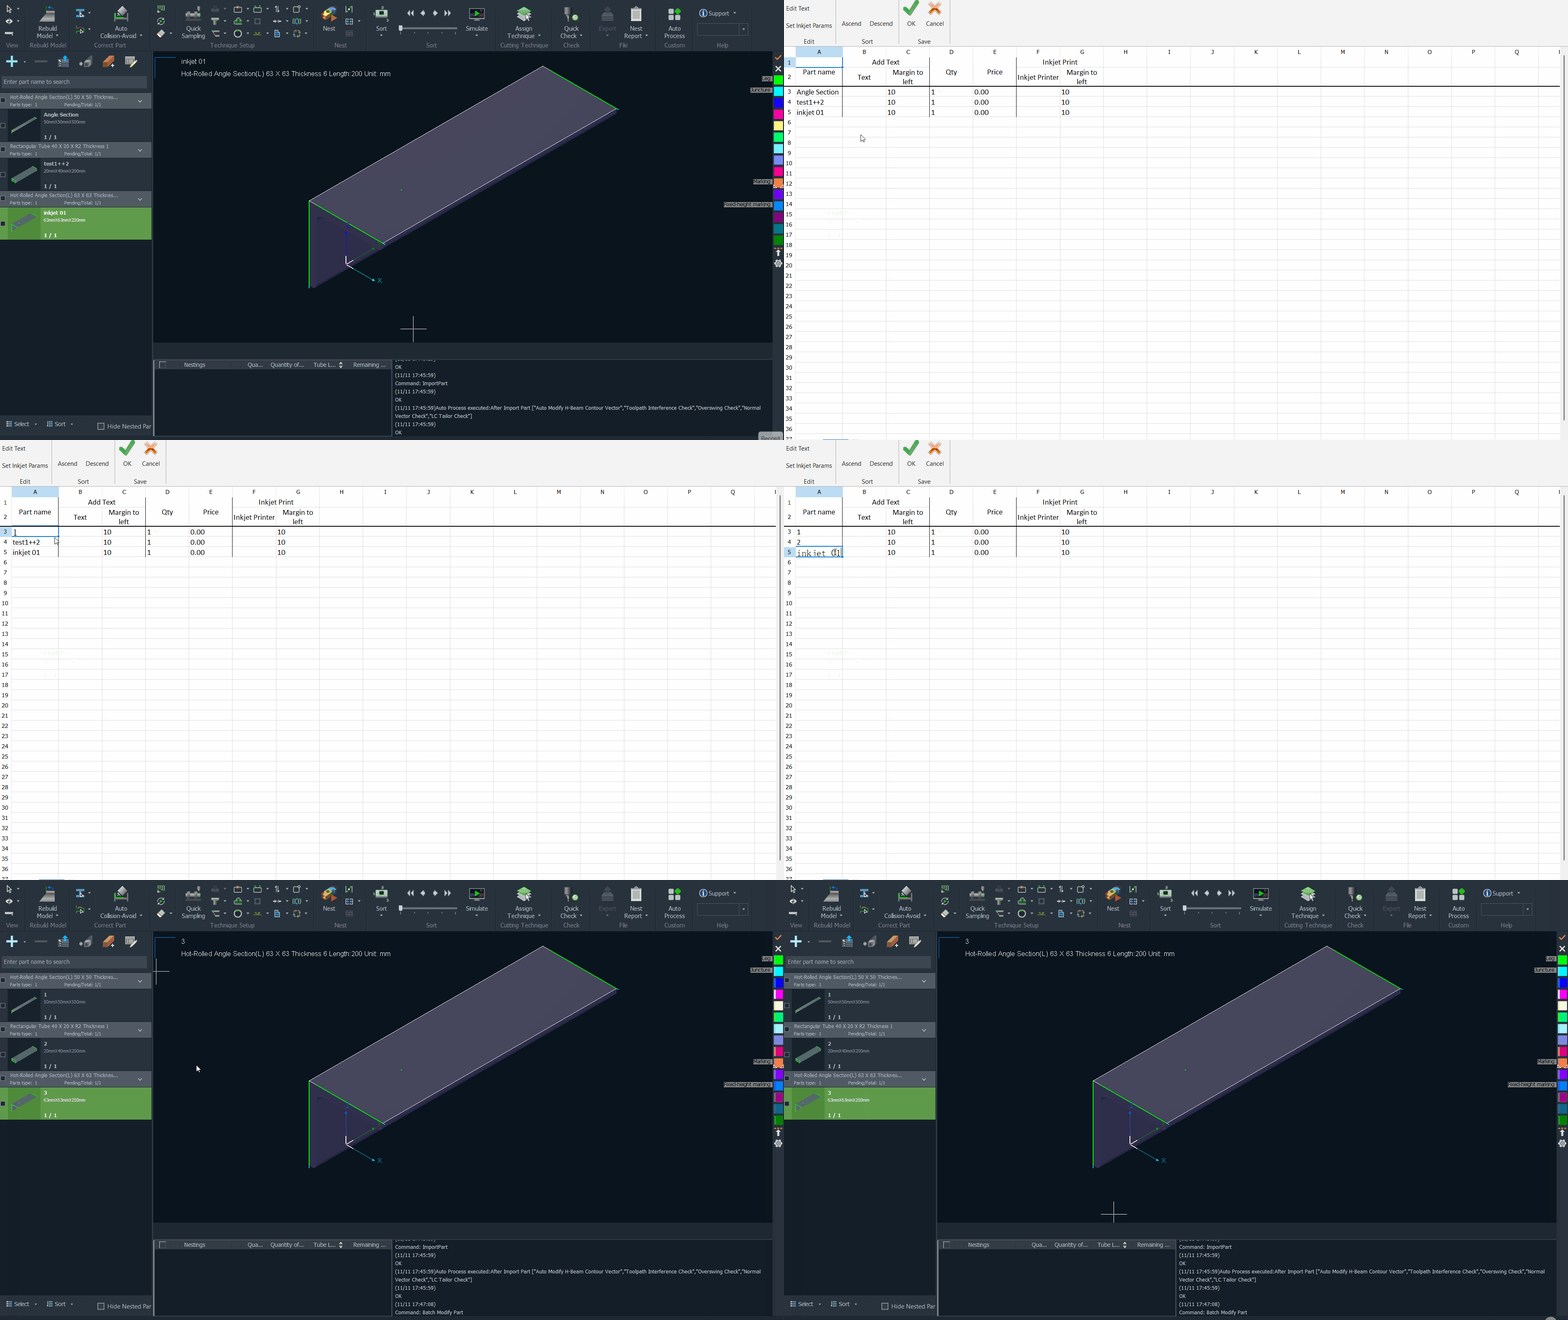
1. Batch Modify Part Names
Modify the target part names in the Part name column (Column A) of the Batch Edit interface. After clicking OK, the modified part names will be displayed in the part list.
Please refer to the video below.
2. Batch Add Text
In the Batch Edit interface, set the text content and the distance from the text to the left margin of the tube surface. You can also click Edit Text.
The parameters here are consistent with the Add Text parameters in Auto Process. Please refer to Auto Add Text (2026V2.5 and later).

Notice:
1. If you want to use the part names directly as the marking text content, you can use Ctrl+C and Ctrl+V to copy and paste the entire column of part names.
2. It is recommended to use "Quantity-Name-Number" as the part name when drawing parts. This way, you can quickly separate the quantity and marking text content using Excel's Text-to-Columns feature.
3. After modifying the text content, the software will highlight the changed cells in red and replace the previous marking text.

4. When multiple lines of text are entered in a table (as shown below), the number and order of lines recognized by the software may differ from those in your original entry. Please verify the recognition results and correct any discrepancies.

3. Batch Modify Inkjet Print
In the Batch Edit interface, set the inkjet print content and the distance from the inkjet print to the left margin of the tube surface. You can also click Set Inkjet Parameters.
The parameters here are consistent with the Inkjet Print parameters in Auto Process. Please refer to Inkjet Print.

Notice:
1. The Batch Modify Parts interface does not retain the inkjet print parameter settings from the previous session and will restore default parameter settings upon re-entry. If you set the inkjet print again in the Batch Modify Parts interface with the same position parameters, it will automatically avoid the original inkjet print positions and select other surfaces for application.
2. When multiple lines of text are entered in a table (as shown below), the number and order of lines recognized by the software may differ from those in your original entry. Please verify the recognition results and correct any discrepancies.

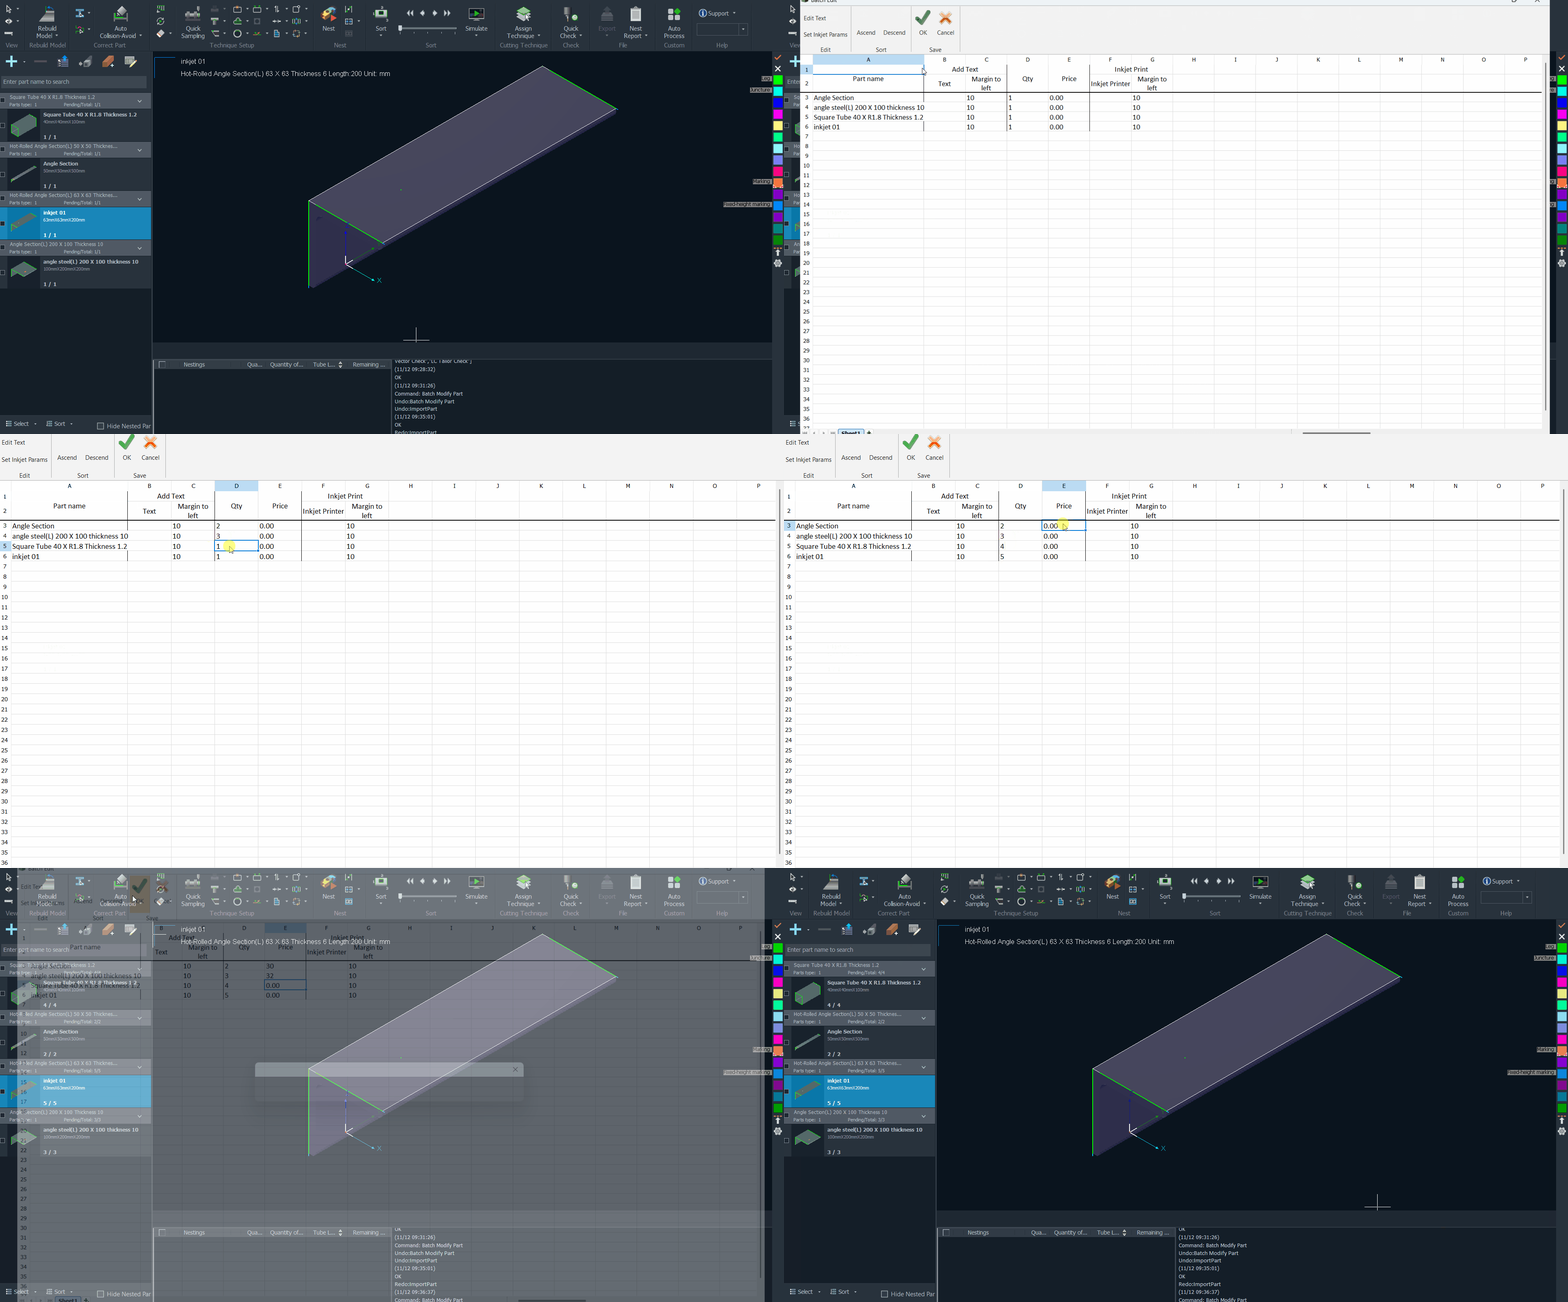
4. Batch Modify Part Quantities and Prices
Edit in the Quantity column (Column D) and Price column (Column E) of the Batch Edit interface, and click OK. Please refer to the video below.
I. Overview
TubesT supports batch modification of part information such as part names, marking, inkjet printing, quantities, and prices, making it convenient for centralized editing and management of parts. The table below shows the version support for each function.
| Function | Version |
| Batch Modify Part Names | Supported starting from 2026V3.2 |
| Batch Add Text |
Supported starting from V1.25: Batch adding text within the software. The added text will be placed at the tube end and automatically avoid inner holes. Supported starting from V1.39: Batch modification of added text content/parameters. |
| Batch Modify Part Quantities and Prices | Supported starting from V1.25 |
| Batch Modify Inkjet Print |
Supported starting from V1.25 |
II. How to Use
In the upper right corner of the "Part List Panel", click Batch Modify Parts to enter the Batch Edit window. After editing, click OK.
III. Function Description
1. Batch Modify Part Names
Modify the target part names in the Part name column (Column A) of the Batch Edit interface. After clicking OK, the modified part names will be displayed in the part list.
Please refer to the video below.
2. Batch Add Text
In the Batch Edit interface, set the text content and the distance from the text to the left margin of the tube surface. You can also click Edit Text.
The parameters here are consistent with the Add Text parameters in Auto Process. Please refer to Auto Add Text (2026V2.5 and later).
Notice:
1. If you want to use the part names directly as the marking text content, you can use Ctrl+C and Ctrl+V to copy and paste the entire column of part names.
2. It is recommended to use "Quantity-Name-Number" as the part name when drawing parts. This way, you can quickly separate the quantity and marking text content using Excel's Text-to-Columns feature.
3. After modifying the text content, the software will highlight the changed cells in red and replace the previous marking text.
4. When multiple lines of text are entered in a table (as shown below), the number and order of lines recognized by the software may differ from those in your original entry. Please verify the recognition results and correct any discrepancies.
3. Batch Modify Inkjet Print
In the Batch Edit interface, set the inkjet print content and the distance from the inkjet print to the left margin of the tube surface. You can also click Set Inkjet Parameters.
The parameters here are consistent with the Inkjet Print parameters in Auto Process. Please refer to Inkjet Print.
Notice:
1. The Batch Modify Parts interface does not retain the inkjet print parameter settings from the previous session and will restore default parameter settings upon re-entry. If you set the inkjet print again in the Batch Modify Parts interface with the same position parameters, it will automatically avoid the original inkjet print positions and select other surfaces for application.
2. When multiple lines of text are entered in a table (as shown below), the number and order of lines recognized by the software may differ from those in your original entry. Please verify the recognition results and correct any discrepancies.
4. Batch Modify Part Quantities and Prices
Edit in the Quantity column (Column D) and Price column (Column E) of the Batch Edit interface, and click OK. Please refer to the video below.

